Overview
This document outlines the process and requirements for integrating your marketing attribution platform with a customer's Snowflake instance. The integration enables data from your platform to be written back into the customer’s Snowflake instance. Two primary approaches are covered:
- RevSure Airflow Spark Job to Snowflake: Direct integration using Spark to load data into Snowflake.
- RevSure Airflow to S3 to Snowflake: Data is first loaded to S3 and then copied into Snowflake.
Flow Diagram
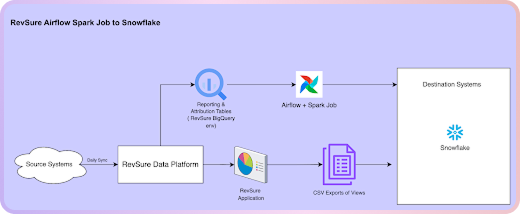
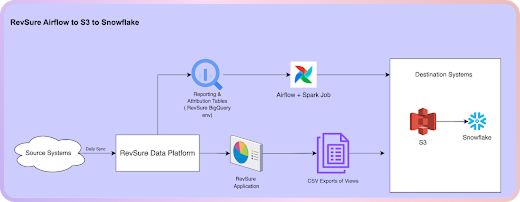
The write-back flow is initialized after the Primary Connection Sync (in this case, Salesforce) completes.
1. RevSure Airflow Spark Job to Snowflake: Data processing is handled by Spark jobs, which directly write data into Snowflake using the Snowflake Spark connector.
2. RevSure Airflow to S3 to Snowflake: Data is first uploaded to an S3 bucket, then loaded into Snowflake using Snowflake's COPY INTO command.
Prerequisites
Common for Both Approaches
- Snowflake Setup:
- The customer must have a Snowflake instance, along with the relevant database, schema, and tables where the data will be written.
- A dedicated Snowflake user account with the necessary permissions (INSERT, UPDATE, DELETE).
- IP whitelisting or Private Link configuration to enable secure access from the platform’s network to Snowflake.
- Security:
- Ensure encryption (TLS/SSL) is used for data in transit and at rest (both in Snowflake and S3).
- Make sure that appropriate IAM roles and policies are in place to secure the interaction between services.
For RevSure Airflow to S3 to Snowflake: S3 Setup
- AWS S3 bucket for intermediary storage.
- AWS access credentials (Access Key ID and Secret Access Key) or role-based access for S3 uploads.
Technical Implementation
RevSure Airflow Spark Job to Snowflake
Architecture Overview: In this setup, after the Primary Connection completes the Projection Pipeline, RevSure Airflow triggers a Spark job that processes and writes data directly into Snowflake using the Snowflake Spark connector. This is an efficient solution for handling large datasets and performing complex transformations.
Steps
- Connection Setup:
- Snowflake JDBC URL: Use the JDBC URL provided by the customer for Snowflake.
- Credentials Storage: Store credentials securely using Airflow Variables or GCP Secret Manager.
Example JDBC URL:

- Spark Job:
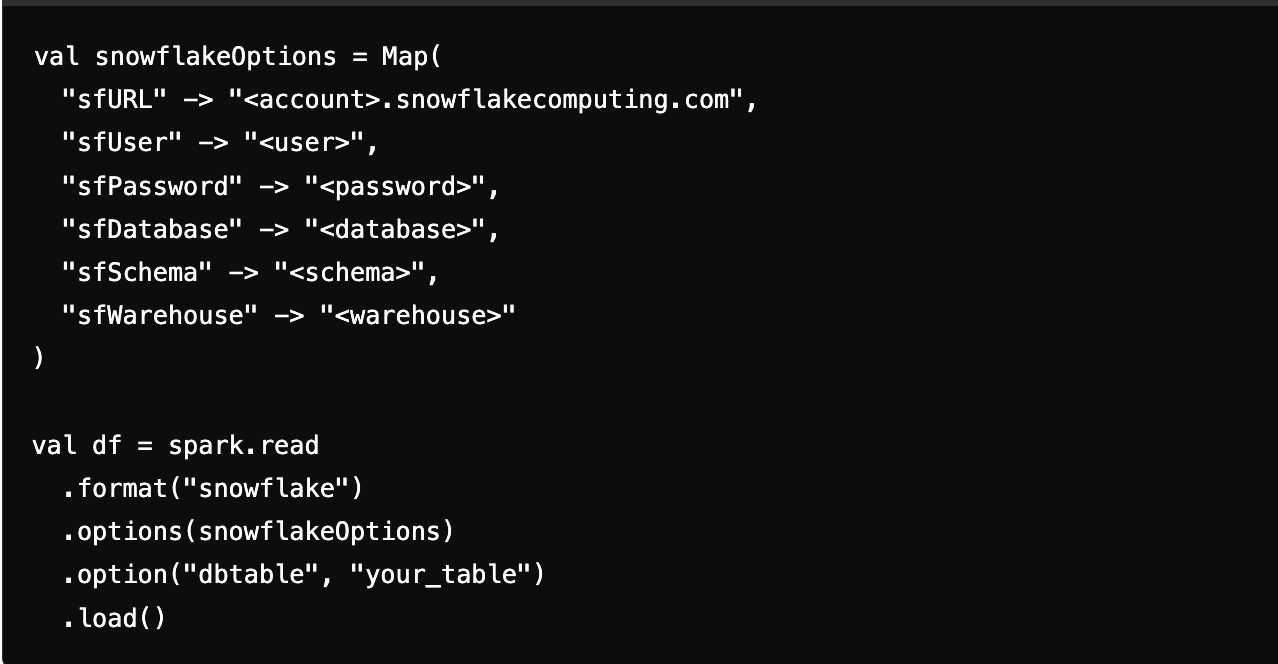
- Install the Snowflake Spark connector on the cluster and configure the data flow to Snowflake.
Example Scala Code:
RevSure Airflow to S3 to Snowflake
Architecture Overview: Data is written to an intermediate S3 bucket before being loaded into Snowflake using the COPY INTO command. This approach is simpler to manage, especially when dealing with moderate data volumes.
Steps:
- Data Upload to S3:
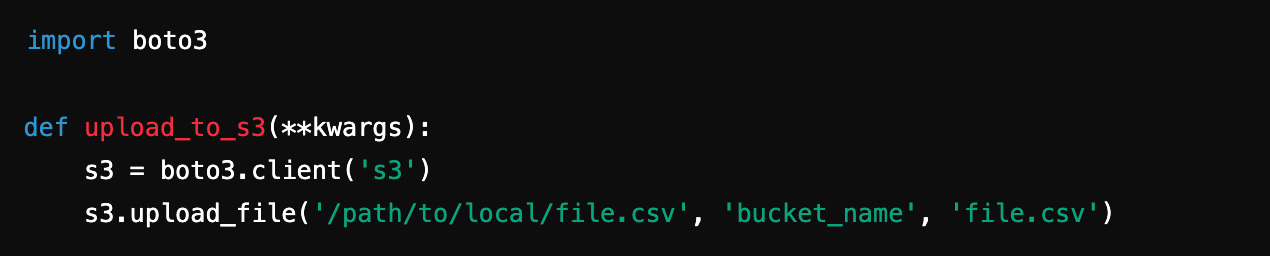
- Configure Airflow to upload files to S3 using AWS SDK (boto3).
Example Python Code for Airflow Task:
- Copy Data into Snowflake:
- Use the Snowflake COPY INTO command to load data from the S3 bucket into Snowflake.
Example SQL Command:
